E-Learning Technology
at the Atlanta University Center Robert W. Woodruff Library
Augmented Reality
Using Augmented Reality: A Different approach to Teaching & Learning
What is Augmented Reality?
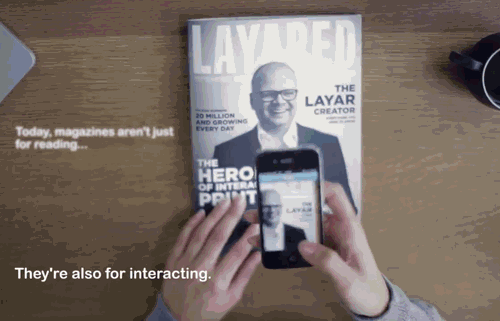
Augmented Reality is an interactive experience of a real-world environment where the objects that reside in the real world are enhanced by computer-generated perceptual information. Its content can be accessed by scanning or viewing a trigger image with a mobile device that creates a subsequent action. This action can be a video, another image, 3D Animations, Games, QR code, or whatever you want it to be.
For example, with eBooks, the course content can be embedded with videos, augmented reality, audio files, etc. Here is a small example:
Why educators should really consider augmented reality approach to teaching
In the era of digital devices, where a majority of school-going kids having access to smartphones, AR is making deep inroads in education, making studies more interesting, interactive, immersive and contextual. Augmented reality apps connected to content can create mind-blowing learning experiences and endless learning possibilities. Independent studies reveal these type of learning experiences really speak to the needs of visual learners.
The beauty of Augmented Reality is that the learning experiences can be as easy or as complex as you want. You can create your own, or download the numerous already-made apps connected to various content. But what’s even more enticing is that students can easily create these experiences on their own in a matter of minutes.
Best Augmented Reality apps for the classroom
Kitaboo is as an award-winning cloud-based digital publishing platform to create, publish and securely delivery multimedia-enhanced interactive ebooks. https://kitaboo.com/
Daqri Studio is a truly creative tool for designing your own Augmented Reality projects. Science teachers are able to use Anatomy 4D (which allows you to view 3-D images of the human body, including the heart) and Elements 4D (which enhances a chemistry classroom by bringing the periodic table to life). https://daqri.com/
STAR Augmented Reality Worksheets: With these interactive materials, the worksheet comes alive and transposes 3-dimensional models and video resources to reinforce content.
CoSpaces Edu is a design tool allows students with coding experience to create virtual 3D worlds, create infographics and tell stories through virtual exhibits and tours. Teachers create a class and post assignments. Images and 360-degree photos can be uploaded, and a companion app is available. https://cospaces.io/edu/
Links/ Resources:
https://thinkmobiles.com/blog/augmented-reality-education/
https://www.ebsco.com/blog/article/top-10-augmented-reality-tools-for-the-classroom
Multimedia Resources
Anyone learning multimedia production will inevitably hit a few roadblocks in their projects. Luckily, there are many resources available, both in the AUC Woodruff Library, and online generally. Here are a few resources you can check as you learn to take pictures, edit video, and record audio.
Video Production & Post Production DSLR Video Shooter – This site is chocked full of great DSLR info, with high-quality interviews and a great gear guide. However, the real highlight here is the top-quality video tutorials, video product reviews, and podcasts.
https://dslrvideoshooter.com
The Best Free Resources for Budding Videographers https://sproutvideo.com/blog/the-best-free-resources-for-budding-videographers.html
Sixteen free Adobe Premiere Circle Transitions https://www.premiumbeat.com/blog/free-circle-transitions-for-video-editing/
Film and Video Jobs
Mandy: “We have a detailed directory of 100,000+ production companies, film makers, production crews and equipment.”
Creative Cow Careers: “List of available jobs and also the ability to post your resume and go job hunting!”
Film & TV Pro: “The #1 networking and jobs resource for film and TV professionals.”
Resources for background music and sound effects:
Jamendo: https://www.jamendo.com/?language=en
Free Sound: https://freesound.org/browse/tags/music/
Game Sounds: https://gamesounds.xyz/
Zapsplat: http://www.zapsplat.com
CC Trax: https://cctrax.com/
FreeSFX: https://www.freesfx.co.uk/
Dig CC Mixter: http://dig.ccmixter.org/
Using Motion Graphics in Adobe After Effects
Motion graphics and visual effects can take a great piece of video in your project and make it stand out to tell a better story. In Adobe After Effects, the possibilities for editing brilliant pieces are limitless. Using After Effects and your creativity, you could be well on your way to getting your foot in the door at a major production network. At first glance, the panels in After Effects can seem intimidating because there are so many. With practice and consistency you will see how easy it is to understand the workflow and what you want to accomplish for each graphic.
Getting set up in After Effects

The picture above demonstrates what your screen should look like when you first open After Effects. Start by creating a new composition. For now, just use the default settings presented by the pop-up window. Click “New Composition” on the upper right area of this window. You’ll be given the option of choosing your composition settings in the next window.

Workspace Organization
The next best thing to do once opening After Effects is to organize your workspace so that you can work as efficiently as possible. The After Effects workspace can be fully customized depending on your needs for a specific project. Optimizing your interface can help you maintain a consistent workflow without getting bogged down by multiple windows.
The default layout view includes your composition window (center box), your assets (upper left box), your timeline/layers (lower box), and effects/features (right box). Your main tools are located in the uppermost section to the left.

Navigating the interface
To create a solid shape, for example, click the “Layer” tab at the top of your workspace, select “New,” and then “Solid.” This will bring up a box asking you to select a color and size, go with white and “Comp Size.”


Now that a solid has been created in the composition (see below), you should see a new layer popping up in the timeline. You should also see an asset has shown up in the upper left area. Any time you add a file to your project, it will be listed in the “Project” tab. Adding any of those assets to your composition will then show up as layers in your timeline.

Transform Options
Each layer placed in the timeline has a dropdown arrow that opens up basic animation controls. These are your Transform options. Key frames can be set by clicking the stopwatch icons, and experimenting with the position, scale, rotation, and opacity values. There are millions of possibilities for motion using just these tools. Explore & make use of these tools, they are the best way to learn.

Effects & Presets
Located at the Top of the interface, the Effects tab allows you to select specific visual effects and animation presets to add to your layers and compositions. The options for creating beautiful visuals are endless once you start mixing and matching these effects with your assets. Some of these can be quite a heavy load on your system, so be aware that things like Particle World set to 10,000 particles every 1 second may cause your system to malfunction.

Resources & links:
https://www.premiumbeat.com/blog/2d-motion-graphics-after-effects/
Using Animation in PowerPoint to Create Captivating Presentations
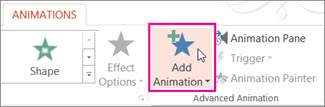
Creating captivating presentations in PowerPoint can be a daunting task. But there are many different tools in the menu at your disposal to assist. The motion path animation effect can be applied to move and slide objects in a sequence to tell an effective story. For example, the picture below displays the many options for object movement, whether it be a photo, shape or letters.

How to Add a motion path to an object
1.) Select the objects you would like to have motion.
2.) On the Animations tab in the menu click Add Animation.
3.) Scroll down to the Motions Paths pane then select your choice.
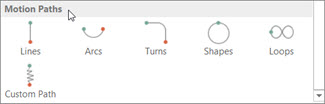
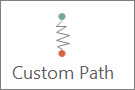
You may also select the Custom Path tab if you don’t find a motion path you want to use. It allows you to create your own path.
To delete any motion path previously selected, on the slide, click on the motion path dotted lines with arrow then select Delete
Animation Tool
Animations can help you control the delivery pace of your presentation. They enhance the appearance of the slides and give them more interest. It is important to use the animations that match the message you are trying to get across.
Transitions are a type of animation in between slides. You can view the Transitions pane to see all possible transition effects. These are ideal when you want to have a noticeable transition between two slides.

Animations are animations on your slide. You can view your options in the Animations pane. These are often used as action effects while you’re presenting your slide.

Common animation types
- Appear – To simply make an object appear in your presentation.
- Fade – Probably most used animation that changes object opacity light to dark.
- Zoom – A good way to quickly add emphasis on an element in your slide.

How To Use
1.) Select object
2.) Select Animations tab in the menu
3.) Next, select which animation you want to use.

Timing & Duration Control
The general rule is to have fast animations, unless you’re animating something in which a slow animation makes more sense. Standard timing for animation is 0.5 seconds.

The best way to quality control your animations is to go through the presentation after you’re done and only pay attention to your animations. Ask yourself, How does the pacing feel? Are there sections in your presentation where there is too much animation? Too little? How’s the timing feel? Reviewing your presentation as a whole makes it much easier to estimate whether your choice of animation makes sense or not.
Best Practices for Collaborative Video Editing Remotely
Due to the recent pandemic COVID-19, schools, libraries & businesses have had to switch workflows to remote because of social distancing measures implemented. Getting group video projects done can be stressful, but even more stressful amid the new remote work norms. From coordinating the remote editing process to collaborative editing apps, here are a few best practices & tips to navigating the challenges of managing a video editing project remotely.
Cloud collaboration tool in Adobe Team Projects
The Team Projects feature in Adobe Premiere Pro allows users to collaborate on video projects from anywhere by syncing changes through the cloud. All you need to do is connect to the Team Projects service and create a team project in Adobe Premiere Pro, After Effects, or Prelude.
Project files are stored and saved in the Creative Cloud, so you can revert and sync project files across multiple workstations. All of the editing are synced between machines using a file sharing service like Creative Cloud, Dropbox, or Box. This is very useful for class projects. Teams can see who’s online and resolve editing conflicts in real-time. It’s like working in the same editing room, from hundreds of miles away. The Team’s feature is available as a subscription service in Adobe and definitely worth it if you often collaborate remotely.
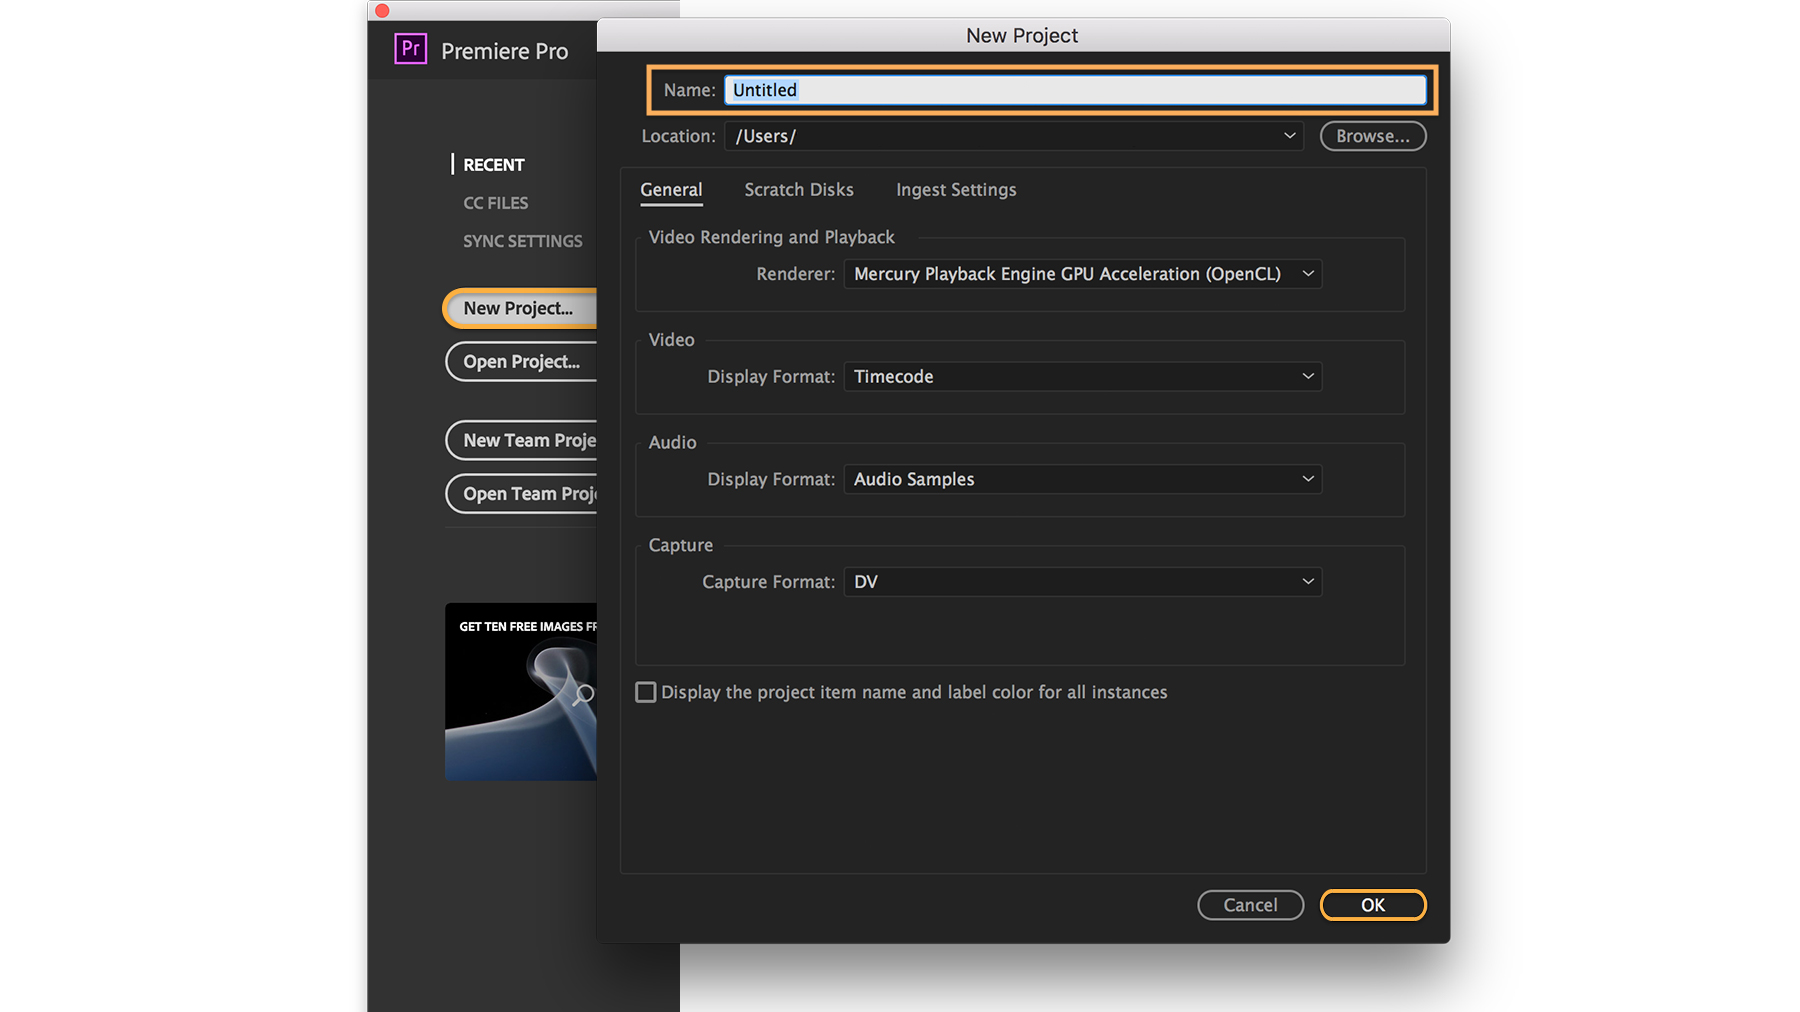
Starting a new project in Adobe Teams
- Launch Premiere Pro then click New Project on the Start screen or choose File > New > Project from the main menu
- In the New Project dialog box, name your project and click Browse to choose where you want to save it.
- Click OK when you’re done
Importing your media
Before you import your footage, click the Ingest box at the top of the panel to have Premiere Pro save a copy of your files on your local drive. Otherwise, Premiere Pro will simply link to wherever your files are currently stored. For large projects containing high-resolution media files, it’s a good idea to save your imported media to a dedicated storage drive so you won’t unexpectedly fill up your hard drive.

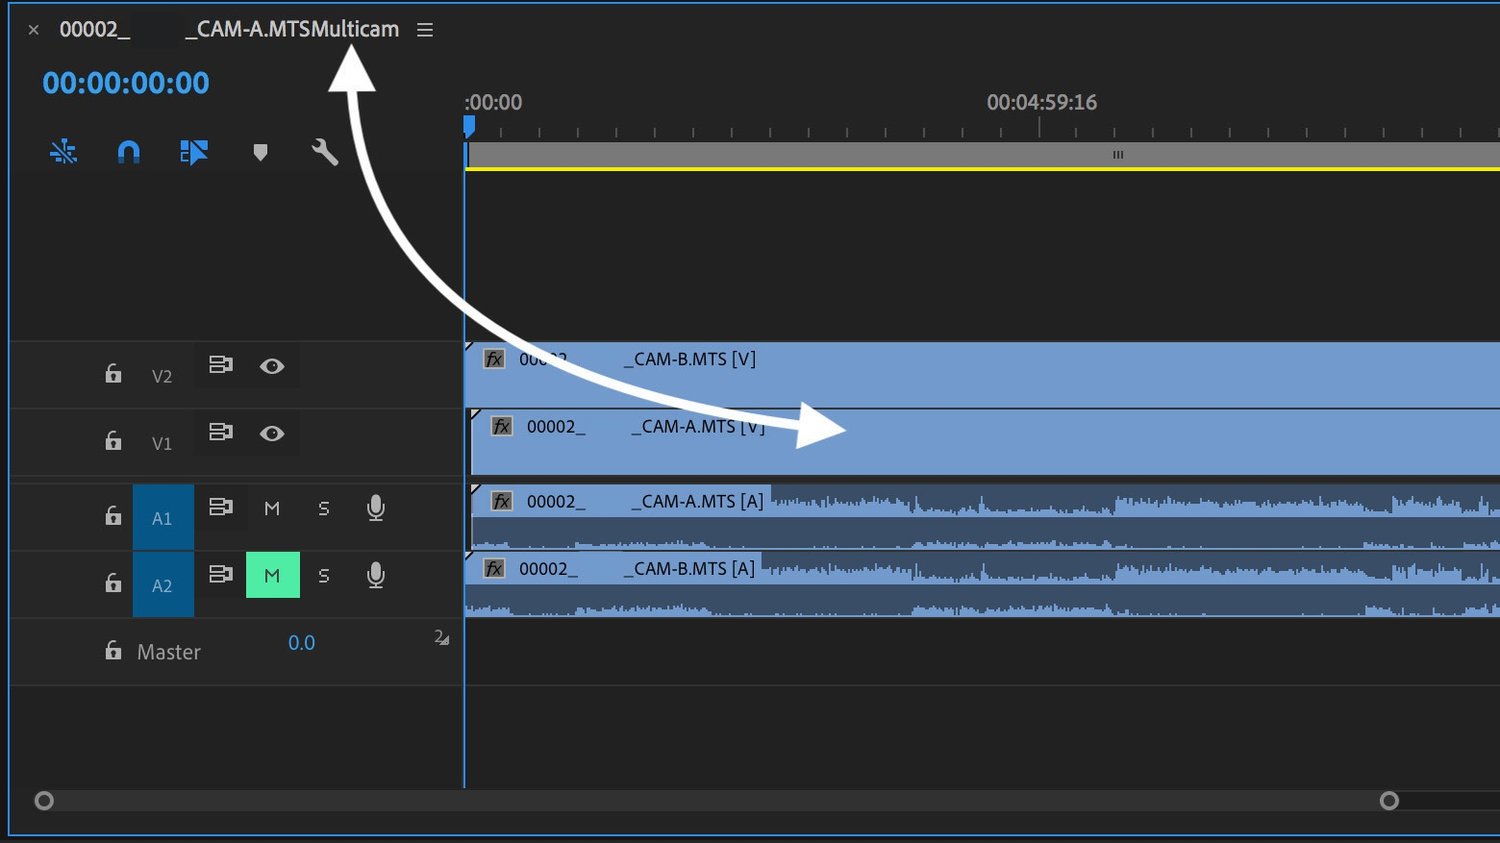
Create a sequence of clips
Switch to the Editing workspace by selecting Editing at the top of the screen or by choosing Window > Workspaces > Editing. Your imported footage now appears in the Project panel. If you don’t see the Project panel, choose Window > Project. Your files may appear in a list; to see thumbnails instead, click the thumbnail view icon at the bottom of the panel. Select the first video clip you want to appear in your sequence and drag it from the Project panel to the empty Timeline panel (choose Window > Timeline if it’s not visible).

Save Color and Effects for the End
Another solid, quick tip in managing remote edits is to always try to save both color correction and grading for the very end. Try to hold off on the majority of your motion graphics, effects, and animations as well. Reserve the first stage of your video editing project for working with ungraded rough drafts until you can get a picture lock. Only then should you start on your colors and effects.
Dropbox Cloud Storage
Dropbox, another great resource for cloud based editing, is the place for your team’s content to come together. It is famous for file management and file handling practices.
Dropbox makes it easy to synchronize files between your devices. When you synchronize your computer folder with Dropbox, that folder’s data will be available to an online video editor and offline editing. Which means you can download files even when all of your other devices are offline or turned off.
Editing Collaboration software apps
Here are a few video platforms used for post production collaboration. Some of these apps are already used as plugins or extensions on editing software to make remote working easy.
- Blackbird – https://www.blackbird.video/ – remote production teams can access video fast from any laptop, making it immediately available worldwide.” One of the worlds fastest cloud video editing publishing platforms.
- Frame.io – https://frame.io/ – an online platform for video post production collaboration. The tool set makes it easy to privately and securely upload, review, and share video with teams using annotations, threaded comments, and tagging
- Wipster – https://wipster.io/ – Wipster is a cloud-based platform for reviewing, approving, and collaborating on video production projects. Wipster helps bring together distributed teams to collaborate on digital media projects in a very effective way.
Remote editing resources
Digital Humanities Tools
There are a lot of tools available to those working on digital humanities projects. However, before you start using tools, you should think about your specific project and what process you should take and what outcomes you would like to have. Because although there are many interesting tools, they may not all be relevant to your work.
That said, here are four popular tools in digital humanities:
Voyant

Voyant is a website that allows you to analyze texts in various ways. It will show you word frequencies and relationships across various visualizations (word clouds, charts, graphs, spreadsheets). The site allows you to input text from any source (including website URLs, copying and pasting, or uploading a file), search through the data, and export your visualizations so others can see them.
Here is an ebook from our AUC Library that used Voyant to do some interesting analyses: Hermeneutica : Computer-Assisted Interpretation in the Humanities
The book’s companion site, Hermeneuti.ca, has several Voyant examples, with links to the authors’ data:
This is one such example: Now Analyze That! Comparing the Discourse on Race
http://hermeneuti.ca/now-analyze-that
And here is the missing analysis from that chapter, which I was able to put together since the authors included links to their original data sources (the two speeches they analyzed):
https://voyant-tools.org/?corpus=82e6708272392deafa79b7be752d10f3
And, just for fun, here is the Shakespeare Corpus in Voyant, showing the most frequent words and contexts throughout all of Shakespeare’s works:
http://voyant-tools.org/?corpus=shakespeare
Datawrapper.de
Datawrapper is a free tool to show data visualizations. You can create or upload your own datasets (usually via spreadsheets or CSV files) and edit the tables and graphs to your liking. Then the site will host your graph and you can embed it in other websites, including blog posts and social media. You can also create a free login to save, edit, and share your visualizations.
To try it out, find a dataset and upload it. (They have a few text datasets on their site; just click to start a new visualization and they will recommend something.) There are a lot of open datasets from government and other sources. CSV files tend to work best for uploading to Datawrapper. Check out:
https://datasetsearch.research.google.com/
To make a simple visualization, I took data from FRED and Yahoo! Finance to make a graph comparing median household income to the Dow Jones:
https://fred.stlouisfed.org/series/MEHOINUSA672N
https://finance.yahoo.com/quote/%5EDJI/history/
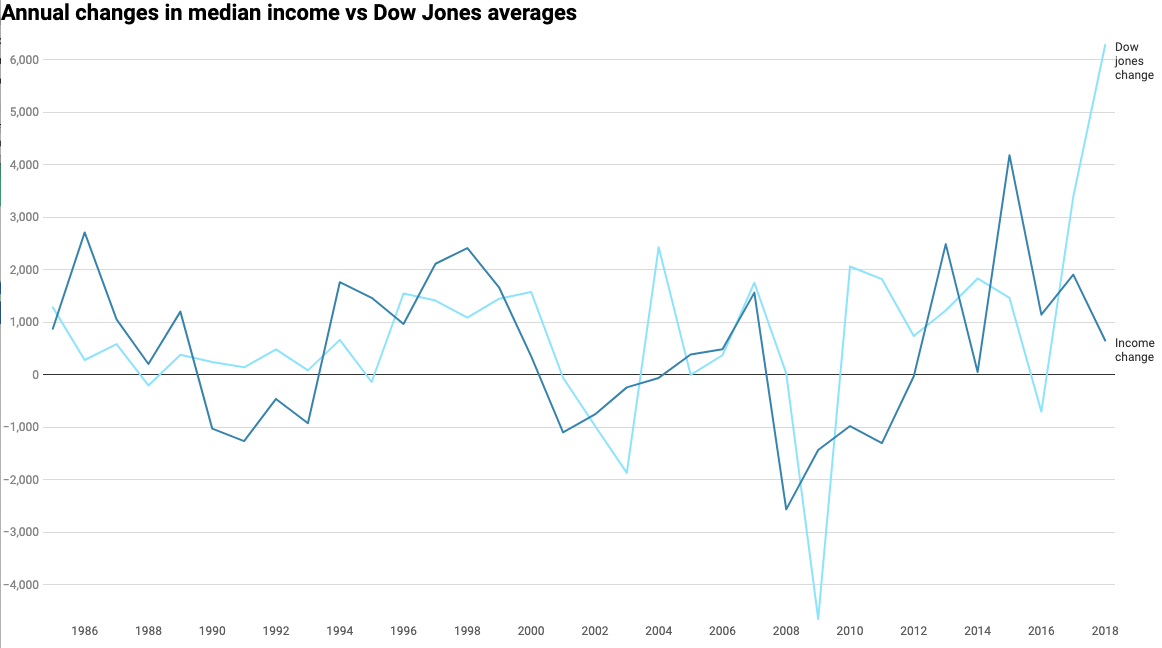
Here’s all of the data from the median household income compared to the Dow Jones:
https://datawrapper.dwcdn.net/ssl64/2/
Unfortunately, this graph doesn’t tell me much. All I see is a line representing Median Income, which is measured in USD, and a line representing the Dow Jones, which is represented in market “points.” So, comparing dollars to points doesn’t make sense. My Dow Jones dataset only has data from 1985 to the present, as well.
So I decided to cut off the comparison to 1985 to the present by limiting my datasets to the measurements provided on January first of each year from 1985 to the present. I also wanted to change the values displayed, so instead of comparing dollars to points, I decided to compare rates of change. I did this by creating a spreadsheet that found the difference between a given year and the year previous (basically subtracting 1985’s value from 1986, then 1986’s value from 1987, and so on). This showed me how much each dataset had changed from year to year, so I could compare the rise and falls of median income to the rise and falls of the Dow Jones.
Here is what that looks like for those data:
https://datawrapper.dwcdn.net/JzCaH/1/
Google Maps Custom
https://www.google.com/maps/about/mymaps/
The same Google Maps that allows everyone to find driving routes and restaurants also allows everyone to create their own custom maps. This means adding any kind of data based on location to show what’s most important to your digital humanities research project. For example, maybe you’re looking at the availability of health clinics in Atlanta, and their locations versus the locations of certain neighborhoods or demographics. You can plot all of that on a custom Google Map!
Rather than invent the wheel, I will link you to an excellent step-by-step way to work with Google Maps. This guide will show you how to import and edit data on Google Maps to make your own custom map with your custom datasets:
Tour Builder (Google Earth Custom)
https://tourbuilder.withgoogle.com/
This is similar to Google Maps, but allows for a more grandiose presentation. Google Earth also allows users to create custom maps… on a 3D globe instead of a flat map.
This guide will show you how to make custom maps in Google Earth:
https://www.google.com/earth/outreach/learn/storytelling-with-maps-using-tour-builder/
Here is an example of a great Google Earth Project that really captures the strengths of using Google Earth in digital humanities projects: “117 Days with JARE (Japanese Antarctic Research Expedition)”
Documentary Film: Shooting & Editing Tips
Documentary films hope to candidly capture a story from real life. This usually involves hundreds of hours of filming and tons of editing. Here are some tips on how to get started on your documentary film project.
Choosing a Good Topic
- Make it a topic you are passionate about.
- Don’t film something that everyone already agrees on. The point is to stir up some controversy or show a different viewpoint.
- Decide whether your topic will be grandiose or small-scale. Then stick to it.
The first step can sometimes take the most planning. Defining what your documentary will be about is the single most important step because all other steps in filming a documentary follow this first step.
Do Your Research
It is important that you do proper research about your topic. It is essential as a documentary filmmaker that you base your film in truth. To ensure your documentary is as accurate as possible, be sure to:

- Take notes as you conduct research, so no important details are left out of the film.
- Interview people, read up on appropriate literature, and check other similar documentaries.
- Decide which points will enlighten your audience and resonate the most with them.
- Make the angle of your topic interesting, emotional, and inspiring.
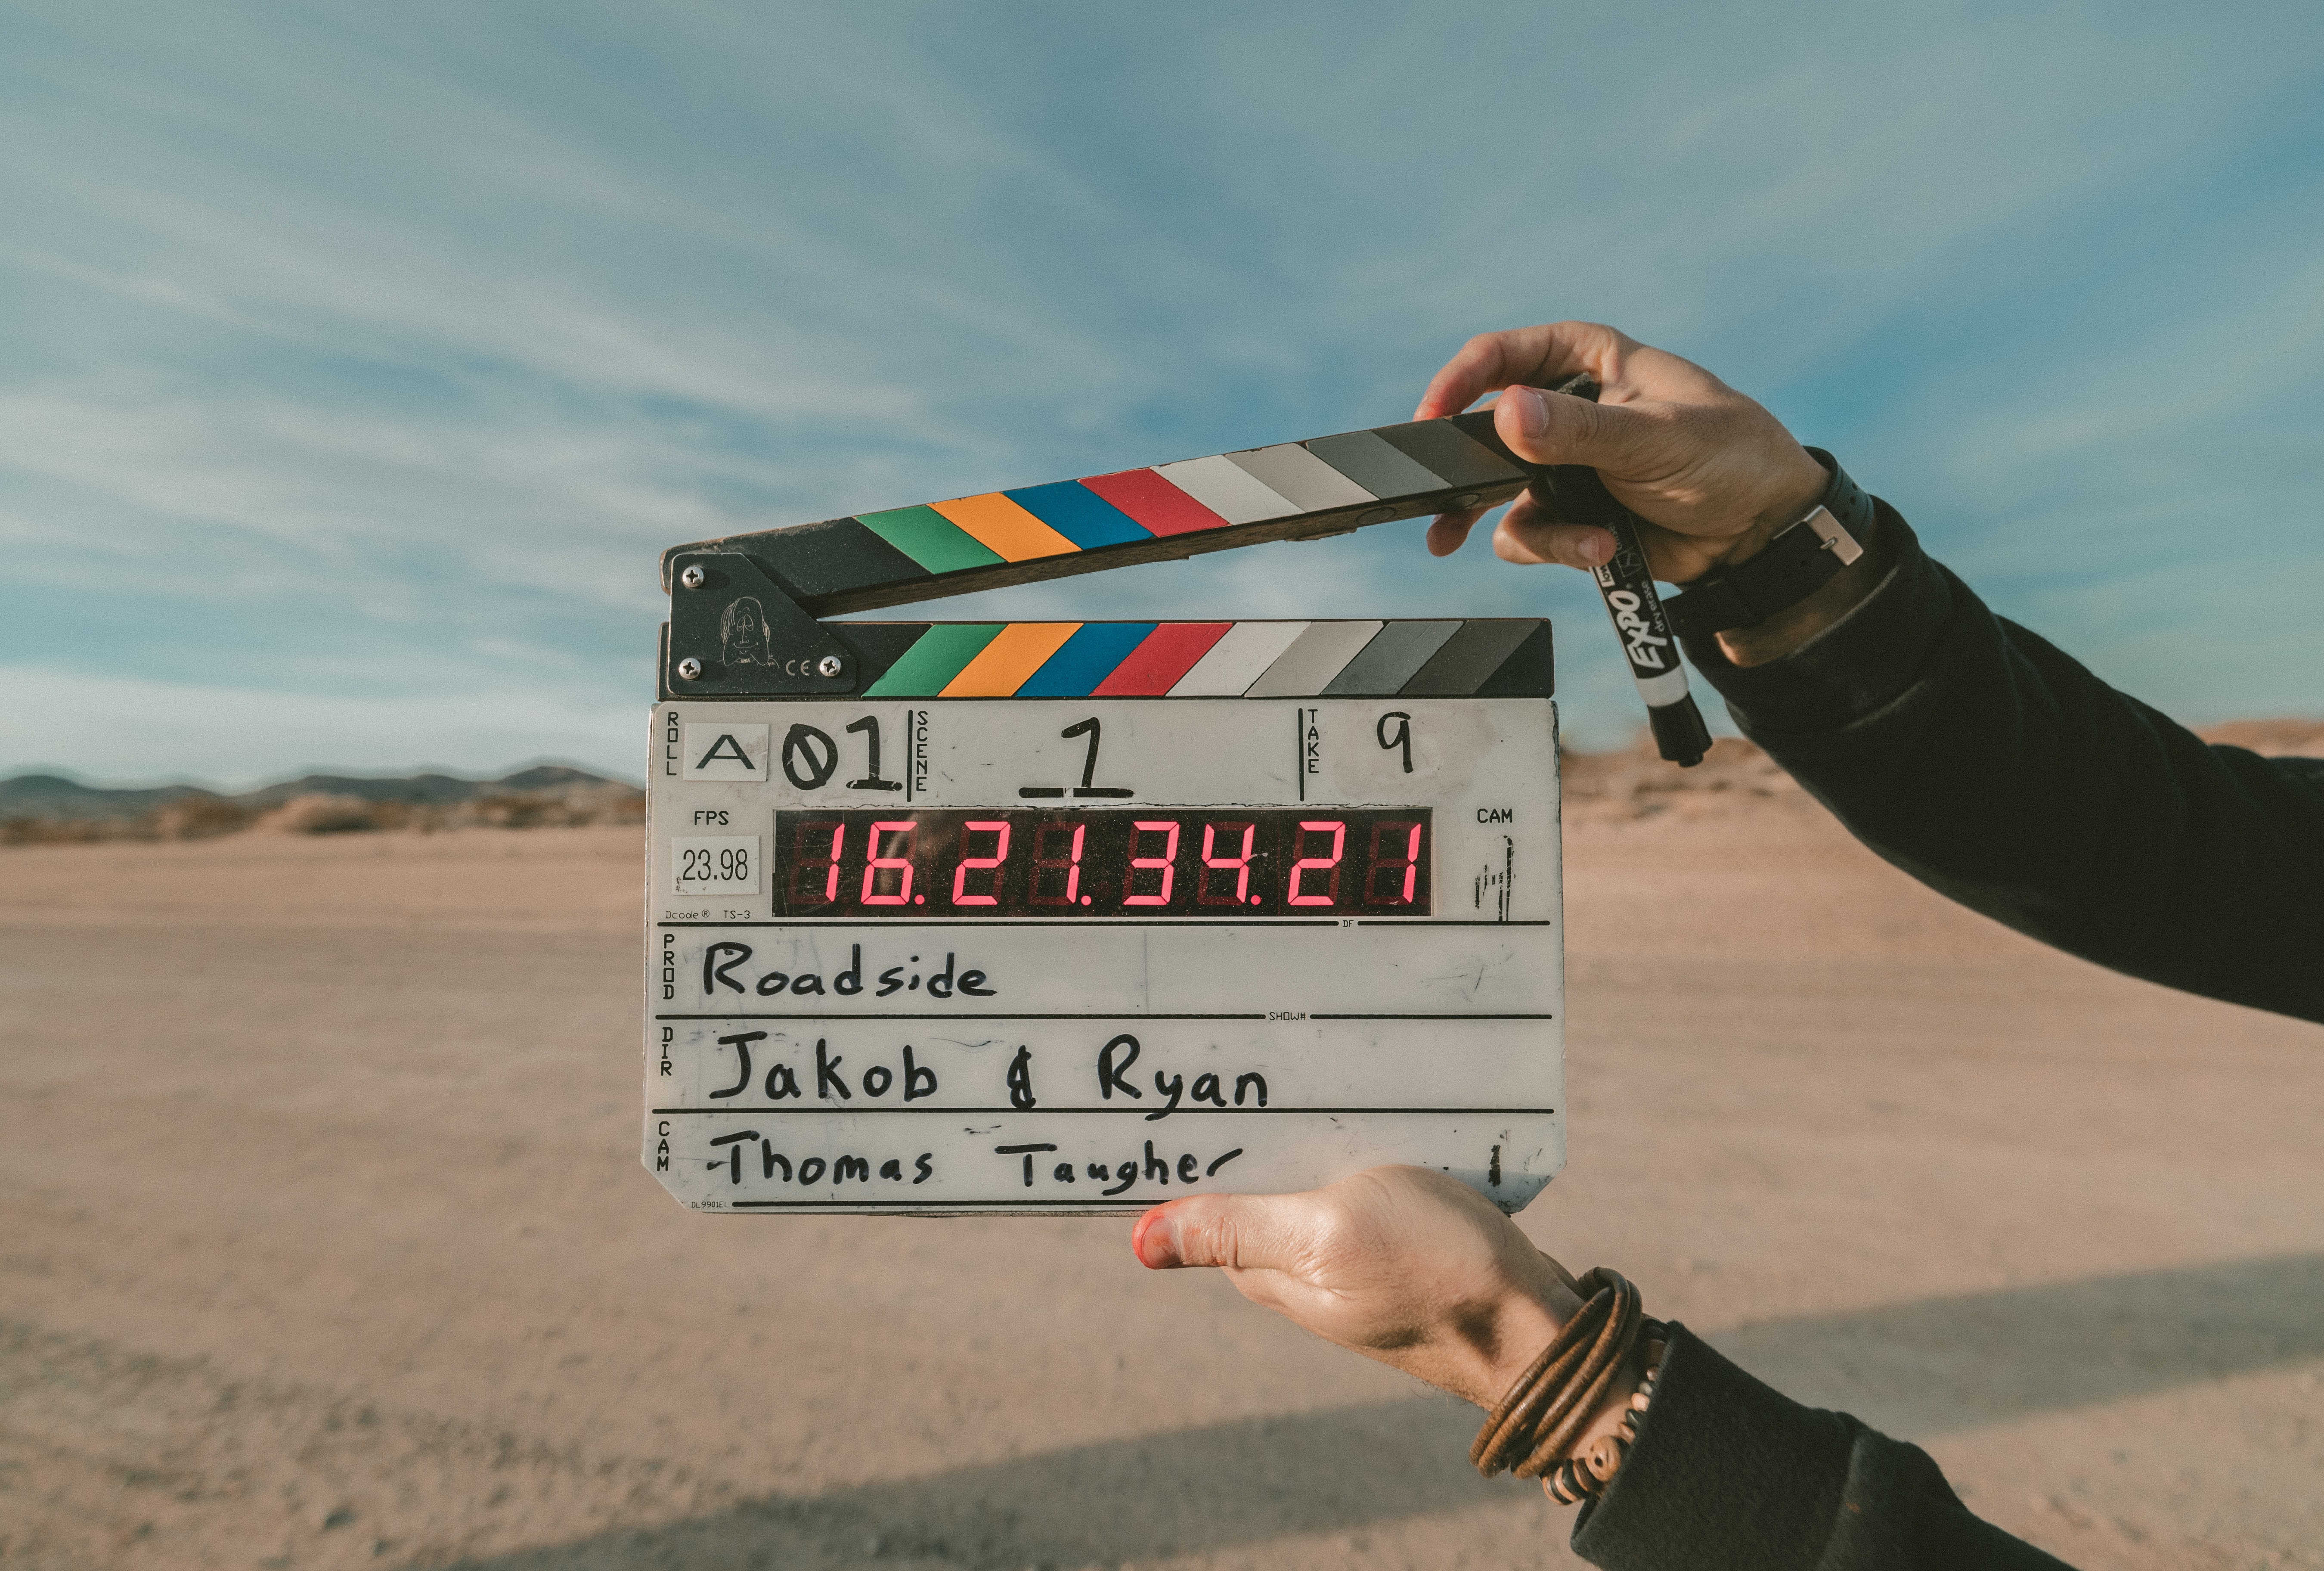
Shooting Tips
- Use a lot of close-ups and medium shots over wide shots—wide shots are great for establishing scenes but aren’t enough to maintain audience attention. Close-ups & medium shots make the speaker on camera more relatable.
- Avoid jump cuts with b-roll of multiple camera angles. This can be jarring, and you usually want to guide your audience smoothly through the narrative.
- When you don’t have footage, use photos. Using photos can help hide edits, jump cuts, and static shots.
Here is a close-up and a medium shot:
Editing Your Documentary
Organizing the footage
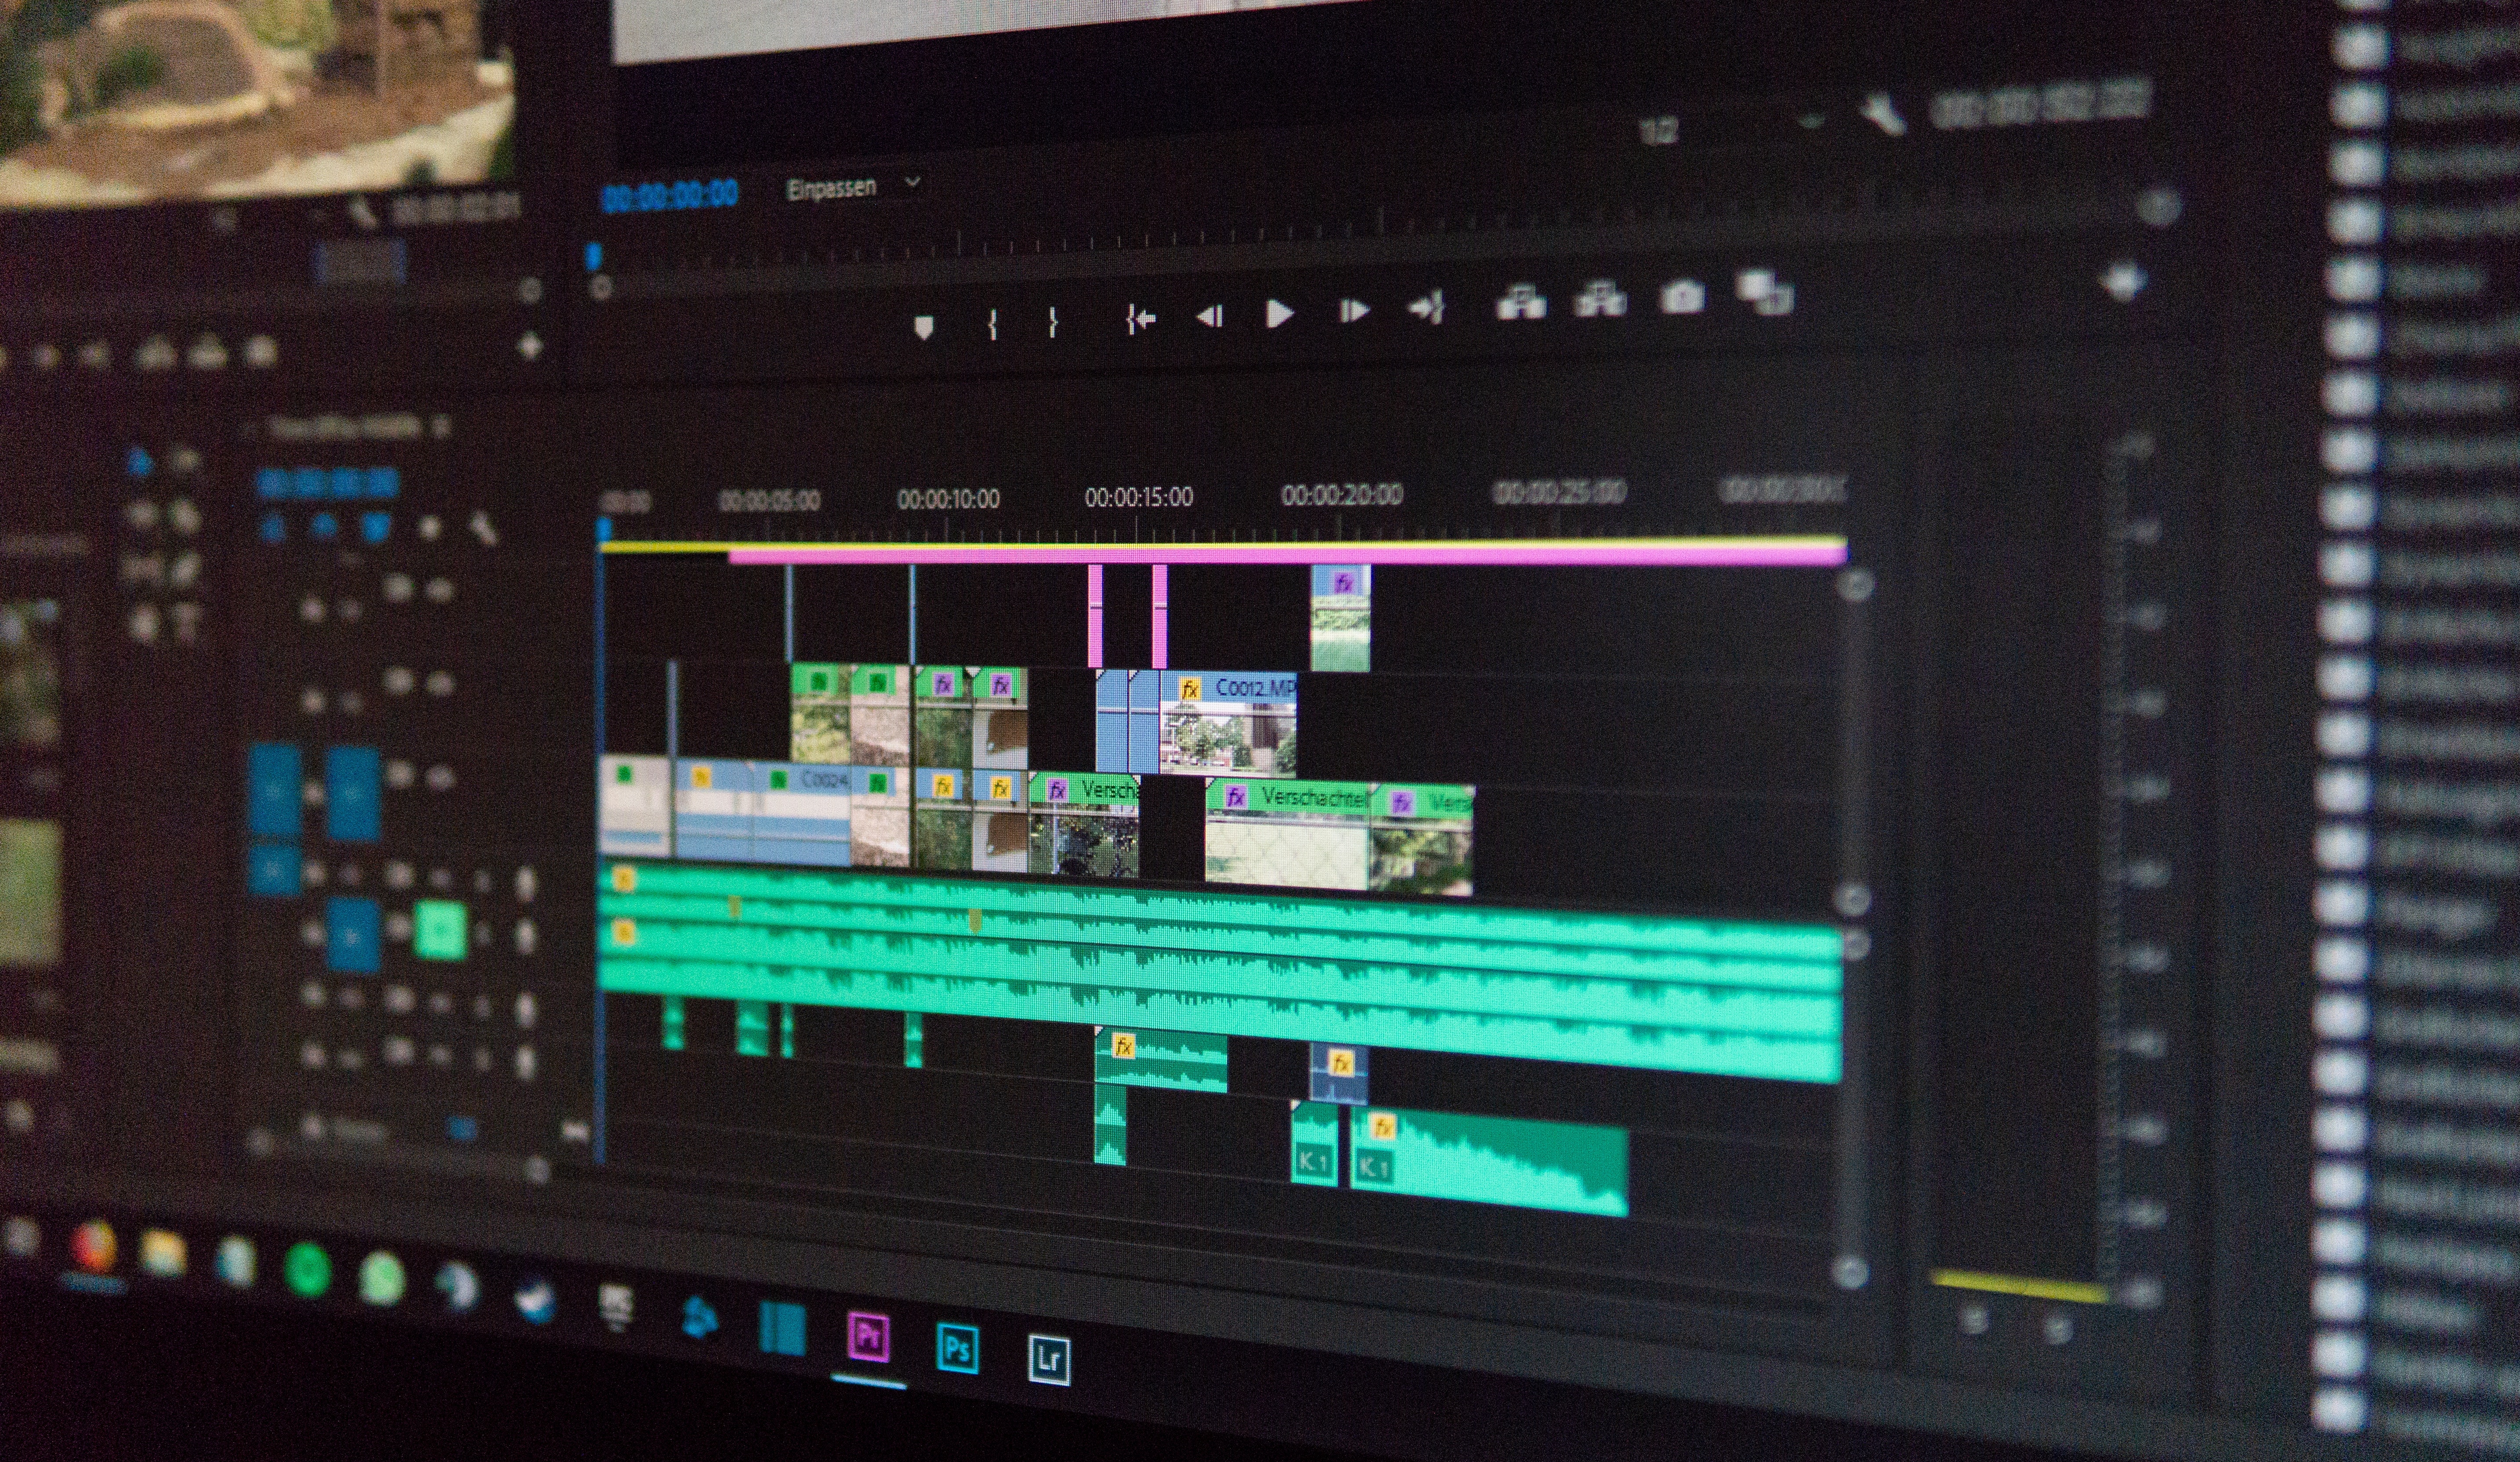
Shooting documentaries will leave you with lots of footage, there’s no way around it. The best way to stay organized is to create folders & bins for your project. The worst thing is to be editing footage on your timeline and to have no clear way to distinguish clips from each other.
- Create and name video project folders (in most cases folders are already made automatically, they just need to be renamed).
- Separate interview footage from b-roll footage and treat each as completely separate. B-roll is to add some variety to the film; the interview footage is a core aspect.
- If you have multiple clips of the same interview make sure to use different naming or numbering to distinguish them from each other. One way to do this is to label your files by date and clip number. For example, naming a file “Librarian Interview 2020-04-17_3” could mean that it is the third clip of the interview you made with a librarian on April 17, 2020.
Create Sequences for individual interviews on timeline
- Create individual timelines for each interview.
- Make cuts between answers and start piecing your story together.
- Cut one sequence at a time.
- Using different audio clips from interviews & b-roll. If placed correctly, audio can tell a powerful story within itself. Be creative, using the multiple video tracks provided in your editing software to get through all of your footage in an efficient way.
Backup everything
Make sure you have already backed up your project by copying the folder structure into an external hard drive. If possible, keep this external drive off site for safe keeping. To be extra careful, save your files to another external drive or to a cloud storage drive online (such as Google Drive, Microsoft OneDrive, or Box).
Helpful links
Adobe After Effects

What is After Effects?
After effects is a digital visual effects and motion graphics application developed by Adobe Systems and used in the post-production process of film making and television production. Among other things, After Effects can be used for keying, tracking, compositing and animation.
Where is everything in After Effects?
Project Panel: Stores all of your media data and files. It is Located to the top left of screen interface. It provides basic information about your media files.
Composition Panel: Serves as a monitor to view all media files & preview of project timeline.
Render Queue Panel: Here is where you are able to view layers & rendering of your composition elements. Placing files in numerical order is very critical for viewing them in the composition panel.
Timeline: This is where your composition and project elements are all laid out to manipulate for the final product.
How to Import footage?
You can import footage by either double clicking the Project panel area or click File > Import File or Multiple Files. Clicking and dragging from the Finder is also available for use.
How to Create A New Composition?
Always create a new (Video) composition first before adding any other items. You can either click and drag media clip(s) down to the composition icon & it will set composition based current footage settings. Also you may click Composition at the top of the screen > New Composition.
Pulling Images & files into timeline?
Select image and/or files in project panel box then drag onto composition in comp panel. If you drag it on the composition video window you may choose “where” to place it, if dragged to the timeline you may choose “when” to place it.
Add special effect to a composition?
Look into special effects menu panel located to the top right side of interface. A vast list of special effects options will be available. Select by double clicking, allow a bit of time for render (depending on which effect) and view it in timeline.
Helpful links for After Effects:
Video Editing Essentials
The General Video Editing Process
Select your video clips —> Create a timeline (in your editing software) —> Organize your video clips —> Develop your sequence plan —> Start editing (clip cuts, transitions, etc.) —> Keep reviewing —> Show to others—> Add finishing touches —>Distribute
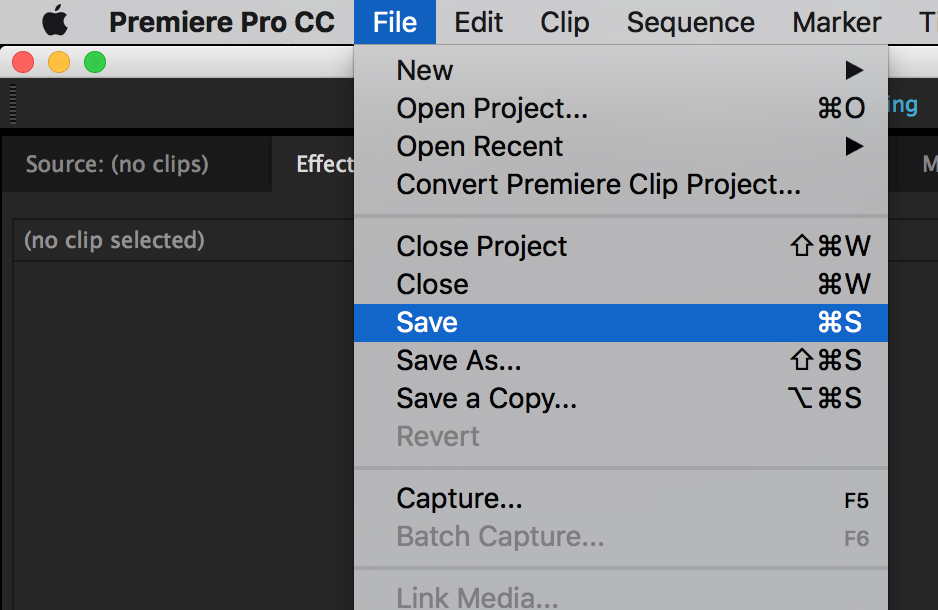
*Always remember to save your project whenever possible after you begin editing. When you make radical changes to the project, save it as a new project file edition (e.g., 1.0, 1.1, 1.2, 2.0, 2.1, 2.2., etc.). And at the end of your current work session, back up your saved project to an external hard drive or online cloud storage location. (Two backups are recommended!)
Selecting your video clips
As you are shooting your project, you should begin to picture in your mind how you want them to be sequenced. Continuity is essential to for viewers to understand the premise and flow of your project. These steps should help in the process…
Shoot for Editing — Select locations and props that you know for sure will contribute to the overall project. Think of it like a puzzle in which each shot is a piece needed to complete the overall landscape.
Select just what the story needs — Don’t be precious about your footage, however proud of it you are. The finished film is the important thing. You may need to leave out some really good stuff if it doesn’t fit in with your overall film. (But don’t delete any clips unless you’re absolutely sure they’re unusable.)
Continuity & Flow
The continuity system is a set of rules for making sure your shots work together. It includes framing, camera position, shot size and editing. Here are a few steps to ensure your story makes sense and has a flow that is easily digestible to viewers. The worst thing is to have great shots and a sequence that doesn’t make sense.
Select the important action — Choose the clips that show the essential action. You can leave out anything that doesn’t help tell the story. Use just the part of the clip that has the action you need.
Show something new with each edit — Show a different subject, or a different view of the same thing: a different shot size or camera position.
Edit on the action — If you edit while an action is happening, rather than at the beginning or the end, it’ll look smoother. Viewers will concentrate on the movement, not the edit.
Choose the right transitions — transitions are the links between shots. Does your scene show continuous action, or one short space of time? You should use cuts, where the shot goes straight into the next one. If you use fades or dissolves, you’ll confuse people. In a cross dissolve or cross fade, the shots dissolve into each other (one image gets weaker while the next shot gets stronger). You can use these to show that you’ve left out a short space of time, or part of a journey. Cross dissolve is probably the most common used transition.
You can use a fade out (usually to black) at the end of a scene. Wipes and other elaborate transitions don’t usually contribute to storytelling.
Fine tuning your Audio
Pay attention to the sound — Don’t have sudden changes in sound level, or dead silence, unless you’re deliberately trying to shock people.
Build your soundtrack carefully — When you have more than one audio track, you need to balance the sound levels. You don’t want background sound, or music, drowning out dialogue.
Use sound that carries across the edit — You can use ‘wild track’, ‘room tone’ or ‘ambience’ — background sound from the location — to avoid silence and keep things smooth. For dialogue scenes — where you cut between shots of each character — try using split edits where the sound changes at a different time from the picture.
Keep track of the bigger picture — Don’t get so bogged down in one edit that you lose track of how it fits into the sequence. Play several shots together — or the whole sequence — to check how it all works together.
Helpful Links:
https://www.slideshare.net/ShiloeRich/video-editing-2-copy
http://lornamediabna.blogspot.com/2011/03/when-editing-these-principles-are.html
